How to Turn On AutoSave in Excel (An Easy Guide)
AutoSave Vs AutoRecover
AutoSave is a new feature in Excel Office 365, while AutoRecover has been in prior versions as well.
AutoSave allows you to save your work in real-time when you save your Excel files in OneDrive or SharePoint.
On the contrary, ‘Save AutoRecover Information’ is an option that automatically saves your work every 10 minutes (or whatever time period you specify). With this option enabled, it will keep a temporary copy of your work and keep saving it every 10 minutes.
In case your system shuts down unexpectedly, you will still be able to recover the temporarily saved file (using the Autorecover feature).
In this tutorial, I will cover both of these features.
Turn On AutoSave in Excel from the Options Dialog box
You can enable AutoSave as well as save auto-recover information (i.e., to save files automatically at a certain time interval) in Excel from the Options dialog box. Once done, this would be turned on for all the workbooks you work on that system.
Remember that AutoSave is only available for Office365 users. If you don’t have O365, you can only use AutoRecover.
Below are the steps to turn on Auto-save in Excel:
- Click the File tab
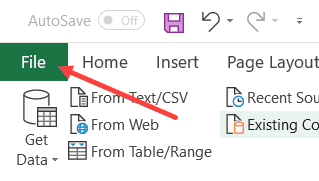
- Click on Options
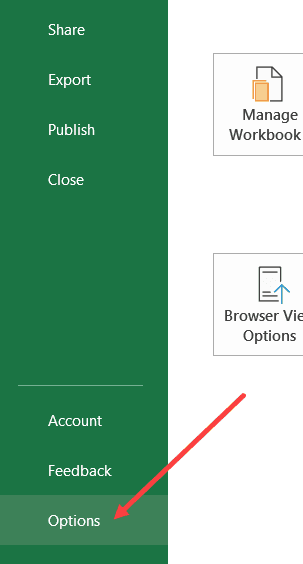
- In the Excel Options dialog box, click on the Save option on the left

- Check the option – ‘Save AutoRecover information every’ checkbox. By default, the value is 10 minutes, but you can choose a lower or higher value if you want.

- Check the Option – “AutoSave OneDrive and SharePoint Online files by default in Excel’. This option works for Office 365 only and saves your work in real-time (every few seconds)

- Click Ok
The above steps would make sure that your work is automatically saved after every 10 minutes.
Note that for ‘AutoSave OneDrive and SharePoint Online files by default in Excel’ to work, your files need to be in the latest file format (i.e., XLSX and not XLS).
Other useful options you can use:
- Keep the last AutoRecovered version if I close without saving: While Excel saves your work every 10 minutes (when AutoSave is turned on), enabling this option will ensure that you don’t lose even the work in between those 10 minutes (in case your system crashed or there is a power failure). When enabled, Excel will show you the option to auto-recover any unsaved files/data.

- AutoRecover File Location: This is the location when Excel saves unsaved files. You can change this location if you want. In case you’re not the administrator, you may not be able to change this.

When AutoSave is enabled (with files saved on Onedrive or SharePoint), you won’t see a prompt to save unsaved changes when you close the file (since these changes are being saved every few seconds).
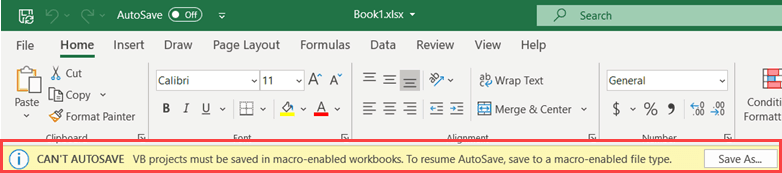
Also, in case you’re adding a VB Code (macro) to the File, AutoSave would stop and will show you a prompt to save this file as a Macro-enabled fike (.xlsm format)
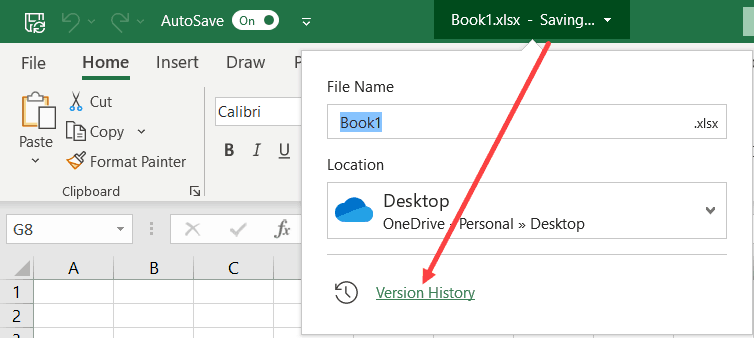
AutoSave now enables Excel users to share files and make changes in real-time. Also, you can see the version history and go back to any previous version if you want. When you open an old file using version history, it will be opened as Read-Only and you can save it with a new name if you want.
Adding AutoSave to QAT (for Office 365)
If you’re using OneDrive or SharePoint, you can also add the AutoSave option in the Quick Access Toolbar (available only in Office 365).
This allows you to enable autosave (in SharePoint or OneDrive) with a single click (it’s a toggle button).
While I found it to be available by default in my Office365 subscription, in case you don’t have it, you can add AutoSave to the Quick Access Toolbar using the below steps:
- Click on the Customize Quick Access Toolbar icon
- Click on Automatically Save option
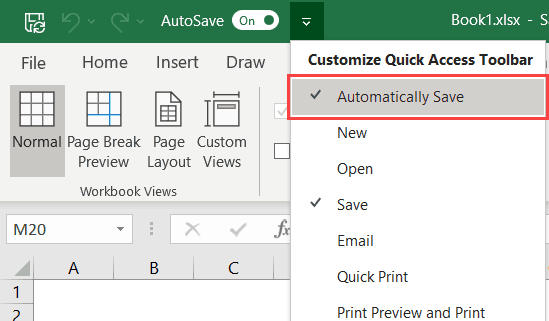
In case you don’t see the ‘Automatically Save’ option in the drop-down, click on More Command and use the Excel Options dialog box to add the AutoSave option in the QAT.
An issue with AutoSave (Save As vs. Save a Copy)
When you enable AutoSave and save the file in OneDrive or SharePoint, you will notice that you no longer see the ‘Save as’ option. Instead, you see the ‘Save a Copy’ option (more on this here)
When AutoSave is enabled and your work is being saved every few seconds, it won’t be possible to make some changes and save it as a new file.
For example, if you start with an old file, work on it for 20 minutes and save a copy, you will have the old file as well as the new file with 20 minutes of latest work. But this isn’t possible with AutoSave enabled where it’s saving your work every few seconds.
This is why you now have the ‘Save a Copy‘ option, which you can use to create a copy and then make the changes.
In case your Excel files are not on OneDrive or SharePoint, you will still see the ‘Save As’ option.
Using Third-Party Tools such as DropBox or Google Drive
You can also get the version history options for Excel files with storage options such as Dropbox and Google Drive.
These tools simply check if there have been any changes in the file and save the prior version. You can then go back to these versions if you want.
One of the benefits of using these third-party tools is that you can easily collaborate with people who don’t use OneDrive.
Since Google Drive and Dropbox are usually preferred over OneDrive by many, this helps when you’re working with teams/clients who use these options.
The only caveat is to make sure you don’t keep confidential data on these cloud storage services.
Automatically Save File Before Closing using VBA
AutoSave is an amazing feature and makes working with Excel a lot stress-free – knowing that the data won’t be lost.
In case you don’t have Office 365 (which means you don’t have the AutoSave feature as well), you will have to rely on Excel’s AutoRecover feature.
Another option you can use is by having a simple VBA code in place that makes sure that your file is saved before you close it. This ensures you don’t lose your work because you closed the file before saving it.
Note: Using this would make sense only if you’re not using Office 365 with OneDrive or SharePoint. If you are, you can always go back to previous versions and your files are saved automatically anyway.
Below are the steps use VBA to save a file before closing the workbook:
- Open the workbook where you want to enable this VBA code to save before close.
- Hold the ALT key and press the F11 key (or Command + Option + F11 in Mac). This opens the VB Editor.
- Double-click on the ThisWorkbook object (for the file where you want to add this code) in the Project Explorer
- Copy and Paste the below code in the ThisWorkbook code window:
Private Sub Workbook_BeforeClose(Cancel As Boolean)
ThisWorkbook.Save
End Sub
- Close the VB Editor
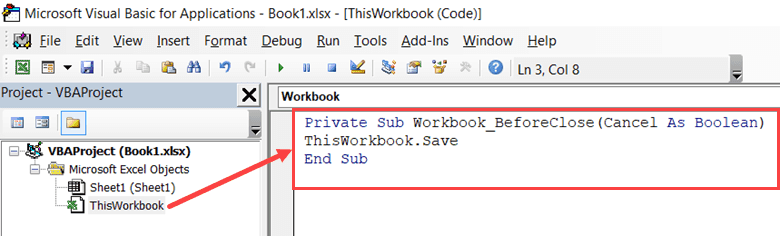
Now, when there is any change in the workbook and you close it before saving, it will first run this code (as this is a VBA Event that runs based on an event – which is workbook closing in this case). This code will first save the workbook and then close it.
In case you haven’t saved the file before, this will show a prompt that will ask you to specify the location where the file should be saved.
In case you don’t want to overwrite your existing file, you can also modify the code so that it saves the file with a timestamp. This way, your work is not lost, and you can also go back to a previous version.
Below is the VBA code that will save the file with the date and time-stamp in the filename:
Private Sub Workbook_BeforeClose(Cancel As Boolean)
wbname = ThisWorkbook.Name
timestamp = Format(Now, "ddmmmyyy-hhmmss")
ThisWorkbook.SaveAs timestamp & wbname
End Sub
This will save the new file with a timestamp in the name in the same location where the old file is saved. If you want the file to be saved in a specific folder, you can specify that location in the code.
So this is all that you should know about enabling AutoSave in Excel and using it efficiently. And if you’re not using Office 365 and hence don’t have AutoSave, you can still configure the AutoRecover options and recover any unsaved files. Also, the VBA code can be used to make sure the files are saved as a copy automatically when you close it.
Hope you found this tutorial useful!
You may also like the following Excel tutorials:
heartbreatha.blogspot.com
ReplyDelete❤
Delete